Table Of Content
Now there are a multitude of avenues one can take when it comes to achieving that soft, rounded brow lamination look. The L’Oréal Paris skincare range is packed with all-star anti-ageing ingredients, from retinol, to vitamin C and hyaluronic acid. Below, we help you formulate your personalised skincare routine for anti-ageing, by highlighting which products and ingredients to include in your regime, plus the key benefits for your skin. Even the professionals have to adjust formulas as they go, so you’ve got a steady balancing act on your hands as you try this from home. But here is the list of products you’ll need for this specific tutorial, with added input from Norris.
Towel Dry and Add Toner
Yes, we’re talking about that celebrated brow lamination look, which is characterised by almost obnoxiously elongated brow hairs that reach as far up your forehead as is fallible. Bleached hair is more fragile than non-bleached hair, and heat can further weaken your strands. Try to cut down on hot tools and opt for heatless styles as much as possible. Even lowering the temperature of your shower water can help save your hair from damage and color fading. Slip on your protective gloves and thoroughly shampoo your hair with lukewarm water to remove every last trace of bleach.
How to (Safely) Bleach Your Hair At Home
Before committing to a new hue, it’s important to take stock of how bleach can impact your strands. Consider these factors before slipping on your bleaching gloves and getting to work. Vol 40 – Volume 40 can provide a high lift, but it can also be really damaging to your hair. If you do use it, make sure it does not stay on your hair for longer than minutes to minimize damage.

Figure Out What Level Your Hair Is and How It Lifts
Wash your hair with a balancing shampoo to balance the pH levels of your scalp. You need to start conditioning your hair two weeks prior to bleaching it. Instead of using store-bought conditioners, opt for deep conditioning masks at least twice a week (2).
Focus On Special Care

Uncover the secret behind youthful skin and discover how to maintain fresh and youthful skin at any age. We are all born with naturally radiant, elastic and soft-textured skin, however, these features fade with age due to water loss in our skin cells. To maintain this fresh and youthful plumpness, we must understand that the skin component controlling these features is Hyaluronic Acid. Though bleaching can help improve appearance, the process does have certain side effects.
DIY Hair Bleaching Step by Step
If you're looking for ways to get a brighter smile without breaking the bank, the dentist-recommended Crest 3D Whitestrips make it quick to freshen up your pearly whites and help to remove years of teeth stains. While in-office teeth whitening can get expensive, Crest Whitestrips are one of the most affordable teeth whitening solutions on the market. Both easy and effective, you can do these at-home treatments all by yourself. Bleaching curly hair, very dark, long, chemically treated, thin, very thick, kinky, dyed, permed, or brittle hair is not recommended at home. Instead, get someone to handle it professionally so you can get the results you want. Inflammation, redness, and a stinging feeling on the scalp are all indicators of an adverse reaction, so practice caution.
What Are Ceramides and Why Are They Used in Skincare?
"When you are in the salon, colorists are careful to not leave in any hair lightening products for too long or use high volume developers that can cause damage," she explains. "If you’re doing it at home, always carefully follow the instructions on the package." That said, if you have dark hair and want to go platinum, you can’t reach that level of lightening with one round of bleach. Valles advises working your way up through different levels of blonde with enough time, ideally a few months, in between each bleaching to let your hair heal. To make your at-home bleach journey a bit easier, we’ve consulted a few experts to help you achieve healthy-looking blonde strands. Ahead, you’ll notice a 12-step bleaching process, along with tips and tricks from hair colorist and R+ Co Collective member Richy Kandasamy and Wella Colorcharm and Clairol Professional Top Artist Oliver Adams.
"When you bleach your own hair, it's almost impossible to not overlap on already bleached hair, which means you could have a lot of breakages, it's just not worth the risk," says Friedman. Oliver Adams is a hair colorist and a top artist for both Wella Colorcharm and Clairol Professional. For each of the sections that you’ve divided, you’ll follow the below instructions. Kandasamy and Adams both suggest taking small portions within the sections of your hair and saturating the strands to make sure the hair is completely covered.
"Some people do not prioritize hair color in their beauty budget. Hair color is the least invasive way to look your best." The other reason for at-home bleaching is the convenience factor. "Everyone is busy. If you are handy, you may be able to get away with doing your color." The bleaching process can cause serious hair damage, but taking the due approach will ensure a smooth and safe experience. Essentially, you need to know what to do prior to the bleaching session, how to bleach your hair step by step, and what hair care routine will help you strengthen your locks and maintain a beautiful color. While we love a good DIY beauty treatment, bleaching your hair at home does not fall into the same category as your beloved #SelfCareSunday face mask.
Most kits come with an extra nourishing conditioner, but you can also reach for a product like the L’Oréal Paris EverPure Sulfate-Free Bond Strengthening Conditioner. Pair it with the corresponding shampoo; together, the fortifying line can help strengthen hair from the inside out—perfect for repairing bleached locks. Follow the instructions from your chosen hair bleach and combine the pre-portioned lightener and developer in a bowl. Following these tips and hair care practices may help prevent hair damage and improve the strength of the strands after bleaching. After 45 minutes, jump into the shower and rinse the bleach out thoroughly.
We’ve also made sure to feature a number of hair care products that you’ll need in the process, including bleaching kits, shampoos, and leave-in creams. Remember that DIY hair lightening is okay only if you have healthy hair, understand the basic color science, and carefully follow the guidelines. Otherwise, you can end up with blotchy color and some serious hair damage. So, if you’re currently experiencing issues such as frizziness, dryness, and breakage, it’s highly recommended to leave the bleach job to a hair stylist or professional colorist.
To avoid significant damage, it’s crucial to give your tresses enough time for recovery, so wait for at least three days before another session. Start applying the product at the back of your head — the hair here soaks up the bleach more slowly than on the top, so it will require more time to achieve the result. Take a few strands within each hair section and saturate them with the product, skipping the roots. For starters, choose a well-ventilated area for your hair-lightening session.
Fortunately, it might be easier to hide a bad bleach job if you’re planning to dye your hair a vivid or rainbow color afterward. “Your bright color will hide your uneven bleach application,” explains Kandasamy. “But if you’re looking for a delicate and sophisticated blonde tone, you would need a professional.” That said, proceed with caution if you're considering giving bleaching at home a try. Along with using nourishing haircare products, take care not to put any additional stress on your strands via heat styling following a bleach job. Reduce how often you heat style, or minimize the time you spend heat styling by allowing hair to air dry most of the way. It’s so tempting to bleach your hair at home to save money and time, but future you will thank yourself for making an appointment with a professional.
Once all the strands are covered in the bleach, go back to saturate the roots. Finally, put on a shower cap or plastic bag and let the bleach sit. Processing time depends on the product you use and the desired result, so make sure you carefully read manufacturer recommendations. The hair close to the scalp processes faster due to your body heat, so you risk making the first inch of your hair look a level lighter than the rest of the hair. To avoid “hot roots”, apply the product one inch away from the scalp on the entire head.
Best hair masks 2024 Hydrating masks for every type and concern - Cosmopolitan UK
Best hair masks 2024 Hydrating masks for every type and concern.
Posted: Mon, 11 Mar 2024 07:00:00 GMT [source]
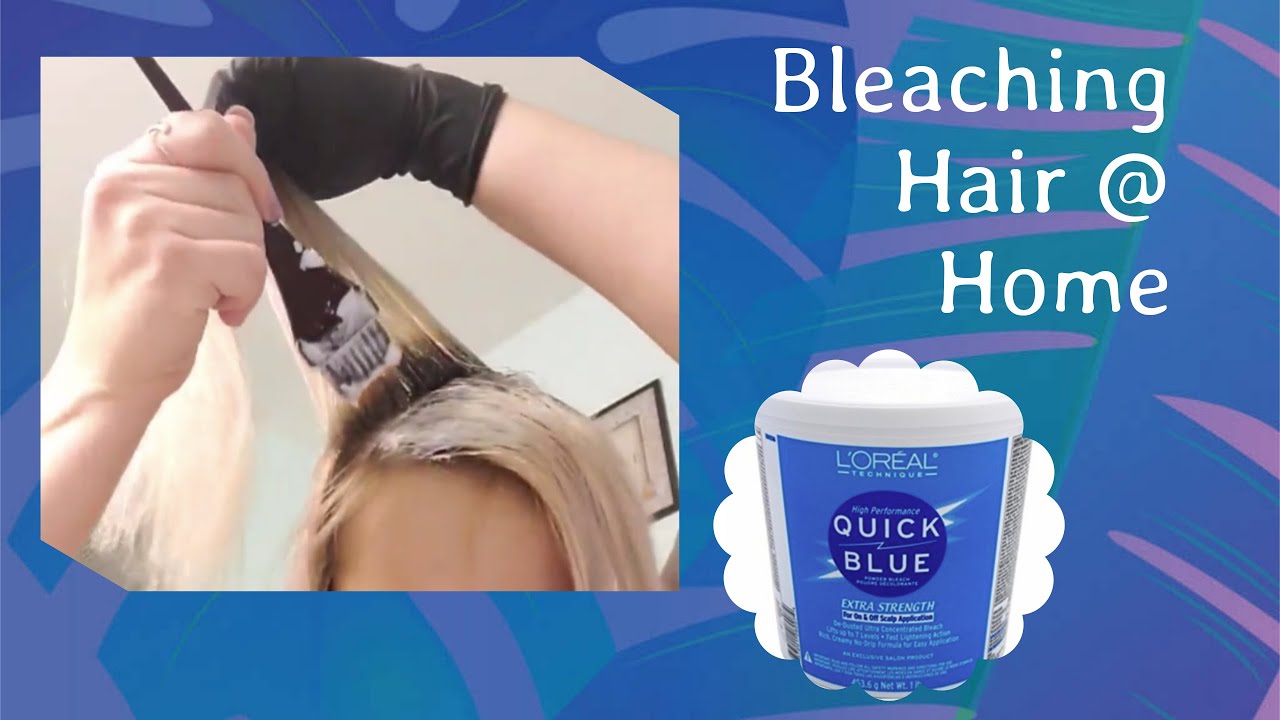
It’s specifically designed to give you a gorgeous all-over bleached, ombré, or highlighted look. Investing in a hair bleaching kit is better than trying to piece together what you need. You’ll want to follow the instructions of a hair bleach kit as precisely as possible, and they generally advise applying bleach to dry hair. Water on your hair will dilute the bleach, too, resulting in a more subtle color change. This is beneficial for those who only want to lift their color a few levels, but that doesn’t necessarily mean it’s a good idea. Wet hair is more fragile than dry hair (meaning there is more room for damage).
This way, the bleach will have fewer chances to damage your hair and leave the strands dry and frizzy. To help your locks retain moisture, start using moisturizing shampoos and conditioners regularly a month before you apply the bleach. Also, use a hydrating hair mask or coconut oil for deep conditioning your hair a week before the session. Opting for a hair bleach kit can simplify the bleaching process, especially if you’re a novice.


No comments:
Post a Comment